Arch 443/646:
Architecture and Film
Getting Started in Dreamweaver
| Arch 443/646:
Getting Started in Dreamweaver |
|
Yes, it
can be a little bit like understanding hieroglyphics... |
| Introduction: |
As part of the course requirement for Arch 443/646, you are required to complete a web page (or set of pages) that are intended to achieve two things. Firstly, I feel it is important for students to be able to create webpages both as a means to publish their work. Secondly, web work is a creative tool and can be used to extend your current base of tools like Word, Photoshop, etc. Thirdly, you will need to be able to prepare online portfolios to both impress and share your work with future employers. My software of choice is Dreamweaver. I have tried Adobe Pagemill (too simple, now defunct), and Adobe Go-live (too complicated and not intuitive). (you used to be able to download a fully functional 30 day free trial before Adobe bought out Macromedia... sigh) If
you are having trouble with anything, they have great online forums. You
can usually find someone that can help answer technical issues. Understanding
HTML code is not entirely necessary, but can be helpful. As Dreamweaver
windows can show your pages in "design view", "code view"
or combined "design and code views", some knowledge of HTML
can be helpful in troubleshooting bugs or in inserting unusual characters.
A great site for learning some HTML moves is: |
| Getting Started: |
1. Make a folder that has your name on it. ie. "boake_terri". Everything that you will be submitting to me will be inside this folder. All I should need to do to upload your website is plunk this folder into my site and upload it. 2. When you are thinking of your layout, I would suggest thinking about limiting the width of your page to 800 pixels as this will view properly on a monitor set for 1024x768 as well as 800x600. It is ok to have to scroll vertically, but having to scroll vertically AND horizontally is not good. Also, your introductory page should completely fit in the window without any need to scroll. Something artistic and nicely designed might have this in effect for all of your pages. "Informational" pages, or ones with a lot of text might be longer in the vertical direction and require scrolling. This web review is technically very competent, but the fact that it requires vertical and horizontal scrolling makes it difficult to appreciate as a piece: kwan/main1.html This one fits neatly in the window: skilton_playtime/index.htm 3. Images and graphics: Unlike other kinds of software that allow you to create some basic images or shapes to enhance your site or layout, ALL images and graphics that are used on the web are created in other programs for use in your files. I suggest doing your image editing in Photoshop. JPEG files are the best bet. All images should be at 72dpi, which reflects universal screen resolution. Saving them at a higher dpi is just a waste of space and increases download times. GIF format files are also OK. To get ready, prepare all of your images and place them in a file folder labelled "images". All of the horizontal bands of colour you see in my pages have been made through the use of "tables" to organize the page. I just fill in the row with a colour. 4. Filenames: All HTML and web work is very case sensitive!!! MAKE SURE THAT YOUR FILENAMES DO NOT INCLUDE ANY SPACES. If you have a space in a folder name, the site will not work! If you want to separate words, use a "-" or a "_". If you have ever downloaded a file and have seen it full of "%" notations, that means that the file had spaces in its name. You have likely all experienced trouble with broken links. This is a result of spelling errors and inconsistent filenames. The most important filename is your opening page. It must be named "index.html" This filename is "magic" on the web. Somehow it knows that anything named "index" is the primary file and it will root to this file. Using the index file as the main file also serves to protect your entire folder. Otherwise someone could type in http://www.blah_blah_blah/boake/ and hit return, and all of the contents of the site would be there for all to see and pillage. If there is an index file present when you hit return, that is all that is exposed or found. I have no idea (still) the real difference between files that end in .htm and ones that end in .html. Dreamweaver defaults to .htm so you might as well just use this and be consistent. 5. Text preparation: You can prepare your text in Microsoft word so that you can run spell checking on it (good idea!). Checking for spelling and grammar is not so simple in Dreamweaver (but can be done). Do not bother with any formatting though as all of this will be lost when you cut and paste it into Dreamweaver. You must use the web program to format all text. 6. Special fonts or fancy text: One of the issues with webwork is that it has to be able to be viewed on all kinds of computers (PC, Mac, Unix), with all sorts of viewers (Netcape, Explorer, Safari) and with all sorts of Operating Systems. Each of these has their own default fonts that it will use or substitute if it doesn't like the ones you have used. Nasty!! Dreamweaver comes loaded with some default font choices (Times, Arial, Helvetica, Courier and Verdana), which although not too exciting, are fairly stable from computer to computer. If you have any main titles, etc that you would like to use an unusual font for, you are best to prepare this piece as an image file so that the font will be preserved. Font substitution from computer to computer will also move your material around as it adjusts to the current perceived size of the text. If you want something to be very stable or static, again prepare a jpeg as a jpeg that is 350x450 on one computer will be exactly the same size on another. 7. Spacing lines: Dreamweaver defaults to "paragraph" format when you are typing text. If you hit "enter", you will drop down what appears to be a double space, like this If you hit
"shift enter" you will drop down what appears to be a single
line, like this 8. Name your pages: I am sure that many of you have bookmarked sites when you are doing a web search, only to go back through your bookmarks and find a lot of bookmarks titled "Untitled". That means that the web author did not give the page a title. Be sure to title each and every page in your site. If someone wants to send someone your page, and uses the "send link" command, the page title automatically appears in the subject window of the mail message. It also serves as the name for the bookmark command. The information in the name of your page also is the starting point for Google when it begins to do a web search to create its databases. If you put your name in the title, you are likely to be able to find yourself in a Google search in a couple of weeks time after the page is posted. 9. Video clips: If you want to put a video clip on the web, you will not be able to upload your entire movie. I don't have space for that, and the download times will be dreadful. The maximum filesize I could entertain to be included would be 3.0MB. Here is a link to a page from last year. The movie is in .mov format and will require a Quicktime viewer to be viewed. The only way I have done this type of mini movie production is to export my film clips from iMovie (which you have in the lab as well) and select "web" as the filesize and type. If you are interested in doing this, I can attempt to run through this during the tutorial. |
| Help files: |
All of these pdf files have been borrowed from the IST Dreamweaver course files site at UW. I am certainly not expecting you to go through all of these ... but they are here for when you want to expand your skills. Some of them refer to Dreamweaver Version 4 and some to Dreamweaver MX. The current version is Dreamweaver MX 2004. For better or for worse, I have done my entire website without really going past the first of these documents. 1. Basic Introduction to Dreamweaver: Setting up your site 2. Dreamweaver Advanced: using layers 3. Doing Frames with Dreamweaver 4. Making dropdown menus with Dreamweaver 5. Preparing Graphics for Dreamweaver 6. Making forms for use with Dreamweaver |
| Keep it simple.... |
Complicated is not necessarily better. Particularly when you may be using a web site to upload your portfolio to send it to an employer to show off your work. Not all employers are web and computer savvy... They are busy. They don't want to play computer games. Flash sites are often time consuming to load, difficult to navigate and prevent people from bookmarking or sending specific pages. I have wilfully chosen NOT to use flash on my site so that I can send each and every page as a separate link, and so that all will be easily searched. For search reasons, frames bases sites are also not recommended. You cannot "send" a link to a particular page in a frames layout. The link always goes to the main index page. You need to send a set of navigation instructions with it. You will find that many sites that "look" like frames sites, are actually not. They make each of their individual web pages look like a frames page, by using nested tables... Also, make sure that your site is easy enough to navigate so that (me when I am marking) people can find all of your information. It is not called a web for nothing... It can be a rat's nest too. Information and images are not any good if nobody can find them... I am not saying that my own site is the be-all and end-all. I have literally hundreds of pages, many of which I must update regularly. I have no hired help, it is just me. Your website assignment is a discrete element. Here is a link to a nice article on Architectureweek.com about digital portfolios -- not for now, but for later: http://www.architectureweek.com/2004/0407/tools_1-1.html |
| And now for some fun stuff.... Lightbox |
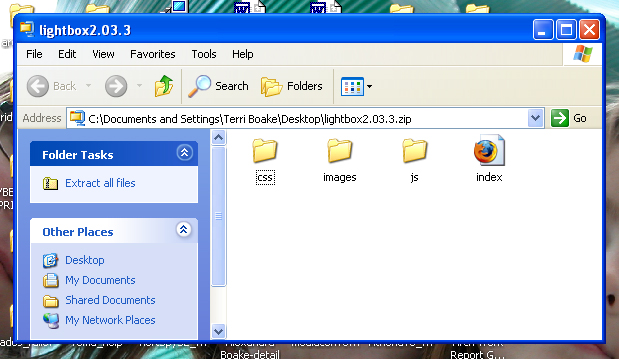
If you feel up to playing with some html code insertions, you might enjoy this way of modifying pop up images to make them less boring. It is called Lightbox. The full information and the download link for the required .css style sheet and javascript are here: http://www.dynamicdrive.com/dynamicindex4/lightbox2/index.htm To make something like this work, you need to go into Design/Code Split mode for the view on your screen. This way you will simultaneously be able to see the html code AND the regular design view, so that you know what you are doing... Be very very careful when typing in your code. If you miss a " or a > it will mess everything up. Also, in order to save, after you type in the code section, put your cursor in the design part of the screen and then save. The special code lines to activate this feature have to be inserted into the "head" of the document. This is located towards the top of the html view page. The head is contained withing two "tags" that look like <head> and </head>. HTML tags are usually seen in pairs with the / version being the second or closing half of the pair. So copy and paste these lines between those two head tags. <script type="text/javascript" src="js/prototype.js"></script> When you download the files for Lightbox 2.03.3 from the weblink above, you will be finding these contents:
The folder labelled css contains the cascading style sheets. The one labelled images contains the little gifs that complete the "look". The folder labelled js contains the java script. The index html file contains the instructions. In order to make it work, copy and paste the css, images and js folders inside your main web folder. If they are not in this location it will not work. You can put your other images in the image folder as well. Then simply proceed to design your page in Dreamweaver and put in your thumbnails and link them to the image you want to appear larger.
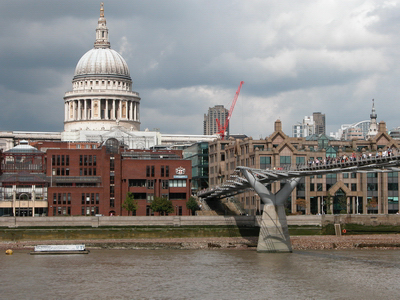
Your code would look like this (the alt line is the description I gave each image): <p> If you pop those out with the hotlinks, they look pretty plain. Now by simply adding rel="lightbox" between the first image name and the > , you will get the effect.
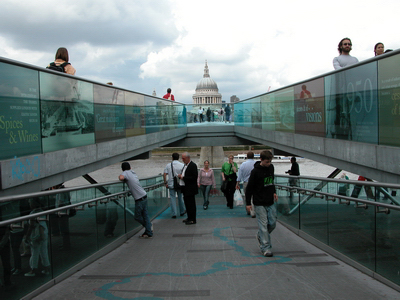
<p> Now, if you want to add a title to the bottom of the image lightbox
pop up box, you need to add
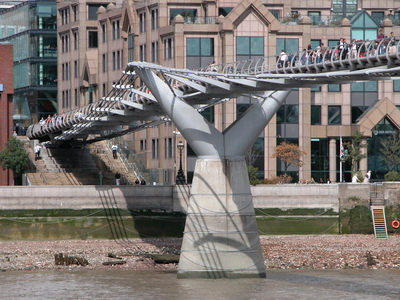
And here is that code: <p> Now, if you want to link all of those images into a gallery that permits you to advance from one pop up to the next without closing the box, just add [group] into the code rel="lightbox[group]". You can have different groups on the same page. Just give them different names.
And here is that code... The PREV and NEXT symbols will just "appear" when you move your cursor over the image. <p> Although the use of Lightbox with image maps does not seem to be published on the Lightbox source pages for technical information, I did figure out how to do it myself. But I cannot get the [group] function to work. This is the code, and this is the sample page link (from my daughter's portfolio...). The thumbnails in this case are part of the larger jpeg, and she has put hot maps over the areas: <body> <div align="center"><img src="images/page_index.png" width="760" height="529" border="0" usemap="#Map"> <map name="Map"> <area shape="rect" coords="304,28,427,58" href="profile.html"> <area shape="rect" coords="450,26,577,59" href="portfolio.html"> There are some aspects of Lightbox that you can change. If you don't like their graphics, just make your own - keeping the same file names. Some additional links http://www.huddletogether.com/projects/lightbox/ And an alternate style of it: http://serennz.sakura.ne.jp/toybox/lightbox/ Have fun with it! It might be nice to use in your own online portfolio.... |